How to Standardize (and Fix) Data Collection in Adobe Customer Journey Analytics

A common challenge digital analytics platform owners face is building trust with the people using their data: the stakeholders. Stakeholders can include marketers, analysts, CRO specialists, product managers, and others.
Understanding various stakeholder needs and identifying and recognizing potential sources of distrust can accelerate a digital analytics platform owner's relationship with data consumers across an organization. Notably, efforts put forth by digital analytics platform owners to better understand stakeholders will help marketers achieve their goals at scale and speed up the path to realizing ROI from a digital analytics platform.
By introducing a governance model and documenting and evangelizing a standardized data collection taxonomy, a digital analytics platform owner can reduce confusion down the line and enable a greater level of true self-service analytics.
To make it actionable and apply this ideology to Adobe Customer Journey Analytics, we typically recommend multiple paths forward for achieving a high degree of data quality and governance in the platform:
- The Digital Analytics Platform Owner should collaborate with their development team to strategize and enhance their digital property’s data layer. Detailed in the Data Layer Path below.
- The Digital Analytics Platform Owner can use native platform features like derived fields to edit and alter the data post-collection. Detailed in the Customer Journey Analytics Path and Classifications sections below.
But what exactly do we want to govern? Let’s take a look at two traditional web analytics scenarios that a digital analytics platform owner might experience:
Scenario 1: Establishing and reporting on a clean URL structure
When it comes to URLs, those with a CMS with folder hierarchy and folder structure are lucky. For example, an Adobe Experience Manager site creates URLs that show the folder path for each page, which in turn will give a sense of where in the website’s hierarchy the page resides.
Those using a headless CMS can create their own hierarchy through a data layer. This URL could mimic the hierarchy found in traditional CMSs such as: domain.com/L1/L2/page-name.
This simple taxonomy makes it easy for marketers to see what level of a site visitors made it to before dropping off and where exactly a page sits if there are site sections in the hierarchy because L1 would equate to the first level of site section, and L2 would equate to the site subsection, and so on.
We can apply a similar level of governance to the page components, standardizing how they appear in Adobe dashboards. Traditional CMS UIs give content authors the ability to drag and drop page components when building a web page. Despite brand differentiation, there are some standardized component names/functionalities: a hero banner, carousel or slider, and CTA button, to name but a few.
This approach will enable marketers to more confidently answer simple questions, such as “which component on the page do people interact with the most?”
A user-friendly component-naming convention could look something like this:
- Nav | About | Executive-Profiles
- Hero | Financial-Report | Read-more
Based on this taxonomy, we know where a user clicks, what component type they clicked on, and which link text they clicked on. In other words, marketers typically need context beyond a simple click, tracking syntax like Link Click | Link Text. By building the context directly into the taxonomy, marketers can more quickly surface insights and speed up the time to act on those insights, ie, which site sections, location on the page, word choice or component types contribute more to a conversion.
Scenario 2: Establishing a Scalable Click Tracking Taxonomy (Data Layer Path)
It’s fair to say that professionals love it when other professionals make it easier for them to look good and achieve their goals. What that means for the Analytics Platform Owner is to map out the taxonomy of what a URL or component click should look like in their data layer, in a format that their development team understands and prefers.
The Analytics Platform Owner should also run specifications by their marketing team to ensure that the net new tagging about to be implemented truly answers their business questions.Once everyone is on the same page about what to track and how, the Analytics Platform Owner should work with their development team to quantify and timebox the effort. Development teams typically work at high velocity and in sprints. The Digital Analytics Platform Owner can help them ease into the execution by rolling out data quality controls for all new pages while prioritizing what existing pages should be updated, and when, to retroactively enhance the data.
| Pros | Cons | LOE | Impact |
| Standardizes URL and component taxonomy | Requires developer resource | Getting developer buyin – you may have to wait for next sprint(s) | Reporting outputs give more context to URL and component data points |
| Getting marketing buyin (everyone has a different idea of what makes sense) |
Once the URL or component name is captured in Adobe, users can use rules to break out segments of data to make it easier to find what a marketer wants, such as, file path, component types, location on a page, etc. Derived fields aid us in Customer Journey Analytics, while similar functionality can be found under classification rules in Adobe Analytics.
Customer Journey Analytics Path
Derived Fields can be used to correct any data points.
Because I’m big on governance, I’d be remiss in not warning that with this option, one could open a can of worms.
As mentioned above, development and marketing teams think differently. The marketing team has an entire spectrum of thinking separate from that of the development team. What seems logical and practical to an SEO expert may not make any sense to a demand generation manager.
My note of caution is to ensure clarity surrounding who has access and permission to use derived fields to change/correct data points. Otherwise, teams could end up undoing and/or interfering with each other’s efforts.
Platform owners can control who has access or permission to create derived fields via the admin console under permissions and roles.
Derived fields are defined within Data Views, which require product admin access. Users can select the components they wish to modify from the menu on the left and click “Create Derived Field”.
In the next screen, users will be given a list of basic functions to choose from:
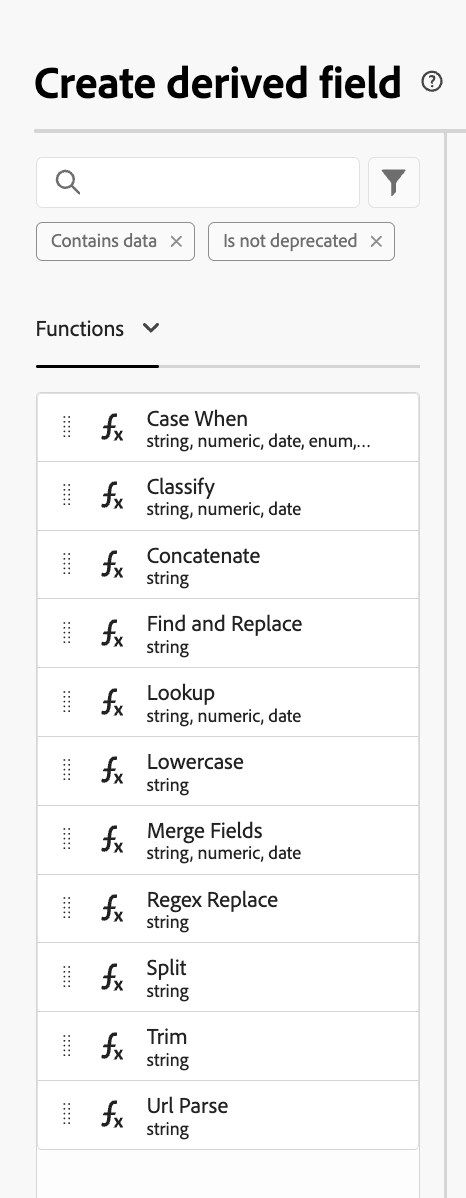
Classify, Concatenate, Find and Replace, and URL Parse might be the most useful options for enhancing data so that it will make sense to stakeholders in their reporting and dashboards.
For example, in an organized folder structure CMS, one can use URL Parse to break out site sections and even query string parameters into separate dimensions, like About Us, Campaign Name, utm_medium, etc. Or one could use Find and Replace to correct hard-to-understand page names.
Drag and drop the functions to the middle of the screen and build out your rules for modifying your data points. The “Final Output” window on the right side of your screen will give you a preview of your new data point.
Some pros/cons to keep in mind:
| Pros | Cons | LOE | Impact |
| Standardizes URL and component taxonomy | More effort on your analytics owner/team’s behalf | Requires CJA product and permission to build derived fields | Reporting outputs give more context to URL and component data points |
| Not dependent on developer resources | Those w/ permission could change data points for the entire team. |
Bonus Path: Adobe Analytics Classifications
Worry not if you use Adobe Analytics, but not yet Adobe Customer Journey Analytics — the classification feature will allow you to also alter the data post-collection.
Development team not able/willing to work with you? It happens. Resources are scarce and the to-do list is never-ending. You can still introduce data quality into key data points in your Adobe platform.
Use the classification importer for a one-time correction of data points or build classification rules to automate new data points coming in.
Classification Importer for One-Time Correction
For the classification importer, create a classification evar in your report suite manager under the report suite you’re working in.
Next, go to Admin > Classification Importer. On the subsequent screen, select your report suite and evar (data set) you wish to classify and download the template.
The template will be in a tab-delimited text file. Use Excel to import the data and leave the top rows as they are. Those top rows are instructions to Adobe telling it which data you wish to classify in which report suite.
The rest of the spreadsheet is where you do your work. The first column will be under the header of “key.” This is the data you wish to classify, or, in this case, change. The second column will be the new classified evar you created in the report suite manager.
Once you’ve filled out your template, save the file as a tab-delimited text file (this is important).
Go back to Admin > Classification Importer, and select the Import File tab at the top of the screen.
From there, select the report suite and data set you’re classifying again, then upload your new text file. You will receive a message telling you your upload was successful, how many data rows were uploaded, and how many collisions there were (meaning, your data classification is at odds with either another rule or another import). There should be zero collisions.
Word to the wise: depending on how big your file is, it could take anywhere from two to three hours or two to three days to process on the Adobe servers. Once completed, you will start to see your new classifications in Adobe Workspace.
If you’re doing a one-time classification of data, the importer functionality is your best option.
Classification Rules for Ongoing Data Correction
If you’re looking to classify new data points as they come in as new data entries, go to Admin > Classification Rule Builder.
From here, you can build rules using “starts with,” “ends with,” “contains” or regular expressions. Select your rule type, then your match criteria and set classification variable (the new one you created in the report suite manager) and enter the classification value.
For example, to correct your domain:
| Select Rule Type | Enter match criteria | Set Classification | To |
| Starts With | www.bounteous.com | Evar 1 (domain) | www.bounteous.com |
There’s an option to test your rule set in the upper right corner of the screen. I highly suggest using it, especially if you’re playing with regular expressions for the first time or are a bit rusty.
Regardless of the classification method you chose, your pros/cons are:
| Pros | Cons | LOE | Impact |
| Standardizes URL and component taxonomy; can be applied retroactively | More effort on your analytics owner/team’s behalf | Create a template for classification importer; or build rules in classification rules | Reporting outputs give more context to URL and component data points and clean up incorrect values |
| Not dependent on developer resources |
There are several avenues at your disposal to help build trust in your platform among your stakeholders. Depending on which Adobe product you’re currently using and where you have resources available to execute, you can enable your marketing team to surface actionable insights faster and, in doing so, speed up your timeline to realize ROI on your platform.
Various methods for improving data collection and governance in Adobe Customer Journey Analytics are available. Depending on your resources and the Adobe products you use, you can streamline data processes, ensure consistency, and ultimately provide stakeholders with quicker, more actionable insights, accelerating ROI on your analytics platform.