Custom Delivery Notifications in Adobe Campaign Standard
Out-of-the-box (OOTB) Adobe Campaign Standard (ACS) delivery notifications are focused on common areas of concern and failure. Customizing delivery notifications can increase marketing automation by providing useful information on successful deliveries, or highlighting unique scenarios within an organization's ACS setup.
Before You Begin
To enable the OOTB delivery notifications, one housekeeping item must be completed. There is a discrepancy in capitalization between ACS and the Admin Console in the spelling of "Delivery supervisors." As a result, users added to the "Campaign Standard - <<clientId>> - Delivery Supervisors" group in the Admin Console will not appear as members of the OOTB "Delivery supervisors (Delivery supervisors)" group in ACS.
To remedy this problem, create an ACS security group, "Delivery supervisors" with the ID "Delivery Supervisors." Instructions are available in the Managing groups and users documentation.
Establish a Notification Strategy
If delivery throughput is low, or a delivery encounters an unusually high soft or hard bounce rate, there is likely a set of individuals at your organization who should be notified so that they can investigate. These individuals should be added to "Campaign Standard - <<clientId>> - Delivery Supervisors" group in the Admin Console, and the OOTB "Default delivery alerting dashboard" modified to use the newly created "Delivery supervisors (Delivery Supervisors)" security group as the "Alert group."
If other types of delivery notifications are desired, determine if the individuals to be notified are the same as those receiving the warning/error notifications, or if there are people who should receive the custom notifications that should not receive the warning/error notifications. One use case for a custom delivery notification would be to send a notification upon successful completion of a delivery so that marketers do not have to actively monitor a send or check-in with the deployment team for updates.
In this example, assume that this notification group contains individuals who should be informed that an email was sent, but would not receive the default notifications indicating potential issues. Following the instructions in the Adobe Managing groups and users documentation, create a new "Delivery notifications" security group and add users to that group as desired.
Create the Delivery Notification
Here are the steps needed to create the delivery notification.
Add a Filter on the Delivery Table
To add custom notifications to a Delivery dashboard, the Delivery resource must be extended with a filter that identifies the deliveries to include in the notification.
Step One: Navigate to Adobe Campaign (upper left logo menu) > Administration > Development > Custom resources. The "Custom resources" list displays.
Step Two: Identify the Delivery custom resource extension:
If there is an existing entry for "Delivery (delivery)," then click that row to edit, OR Click the "Create" button to create a new custom extension:
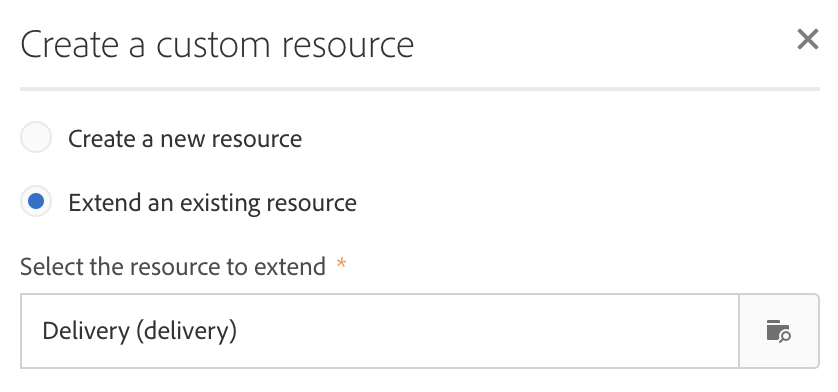
- Click "Extend an existing resource."
- Select "Delivery (delivery)" from the drop-down.
- Click "Create" and the custom resource page displays on the "Data structure" tab.
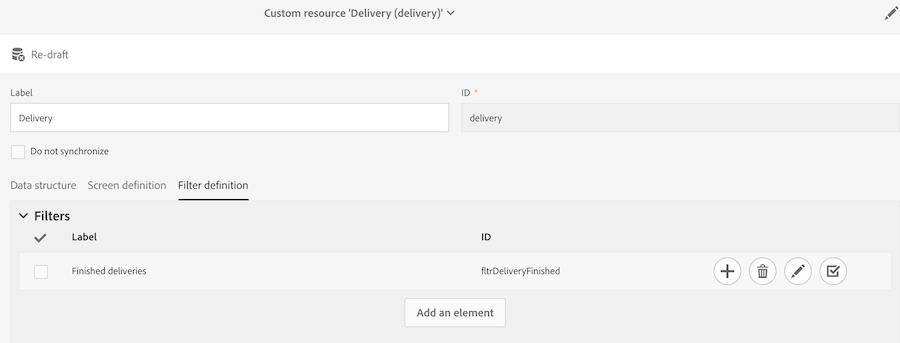
Step Three: Select "Filter definition" and the display updates to show the existing Delivery filters.
Step Four: Click "Create element" to define a new filter.
- For Label, enter
Finished deliveries. - For ID, enter
fltrDeliveryFinished. - Click "Add" and the new filter name displays. Hover over the row to display the contextual menu, and click the pencil icon to edit the filter.
Step Five: Define the filter:
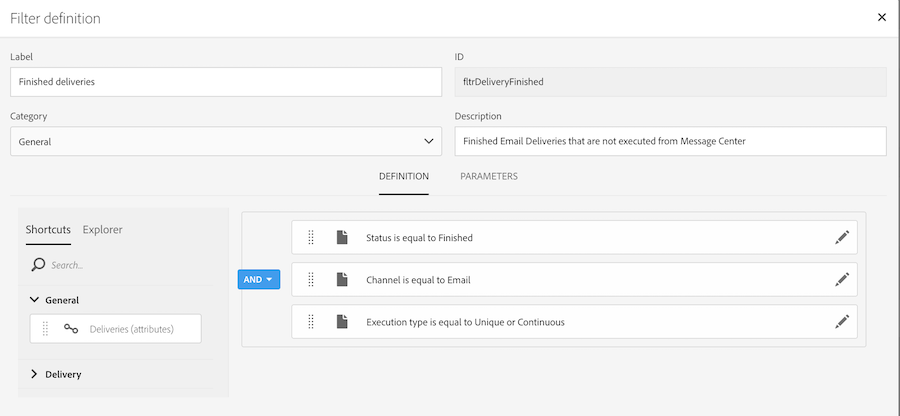
- In the "Category" drop-down, select the Category under which the filter will appear in the "Shortcuts" menu.
- Add a "Description" noting the filter's purpose:
Drag the "Deliveries (attributes)" tile onto the "Definition" palette.
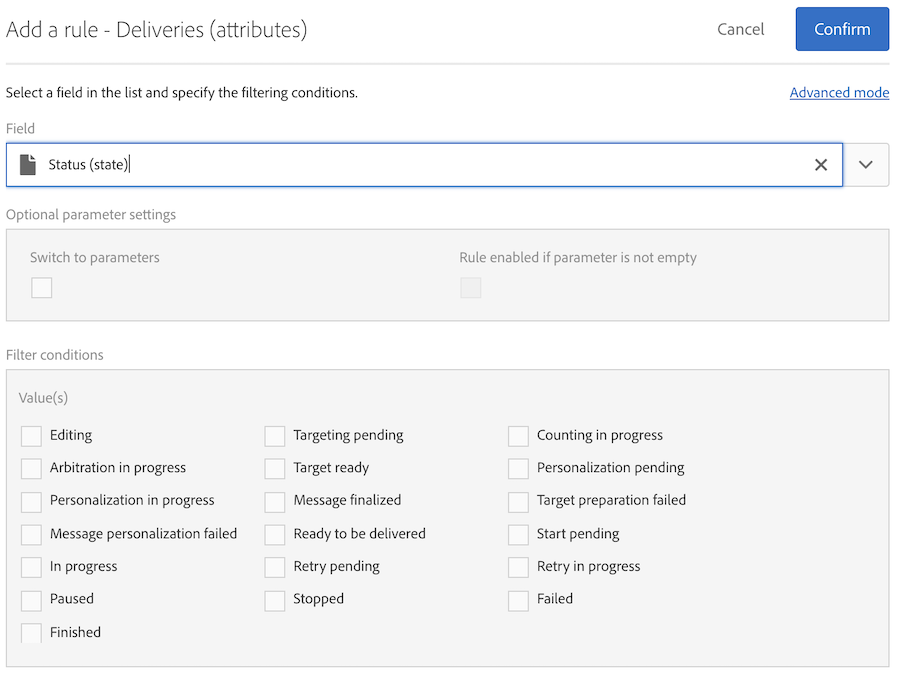
- Select "Status (state)" from the "Field" drop-down. A set of checkboxes of the possible "Status" values displays:
- For this example, select "Finished" so that only finished deliveries are included. If notifications are desired for more than "Finished" deliveries, multiple values can be set.
- Click "Confirm" to save the first rule for the filter.
Drag the "Deliveries (attributes)" tile onto the "Definition" palette again.
- Select "Channel (messageType)" from the "Field" drop-down. A set of checkboxes of the possible "Channel" values displays.
- Check the box for "Email."
- Click "Confirm" to save the rule. The UI now shows both rules, joined by an "AND," i.e. AND is the logical operator being applied to the conditions. Note also that the two rules are enclosed by a border.
Once again, drag the "Deliveries (attributes)" tile onto the "Definition" palette, and make sure that it is dropped within the border-box around the other two rules: the background behind the two rules will change from light gray to light blue when the tile is within the border. This is necessary to group the rules properly.
- Select "Execution type (executionType)" from the "Field" drop-down. A set of checkboxes of the possible "Execution type" values displays.
- Check both "Unique" and "Continuous" so that the filter picks up any non-transactional delivery.
- Click "Confirm" to save the rule. The UI now shows all three rules, joined by an "AND" operator.
- Click "Confirm" to save the filter.
- Click "Save" to save the extensions to the Delivery resource.
Publish the Delivery Notification
Because the filter was added as a custom extension to the Delivery resource, the resource must be published for the filter to be active. Note: publishing is serious business, and you may be presented with a "Re-draft" option in the process. Heed all Adobe warnings regarding Re-draft and only perform that step if you are confident that is the path that must be taken.
Step One: Navigate to Adobe Campaign (upper left logo menu) > Administration > Development > Publishing. The "Publishing" page displays.
Step Two: Click "Prepare publication" to begin the process.
Step Three: Once the preparation is complete and assuming no errors have occurred, click "Publish" to activate the filter.
Enable the Delivery Notification
After publication, the filter that was added to the Delivery resource can be used to create Delivery alerting criterion for inclusion in a Delivery alerting dashboard. Navigate to Adobe Campaign (upper left logo menu) > Administration > Channels > Delivery alerting > Delivery alerting criteria and the list of existing criteria displays.
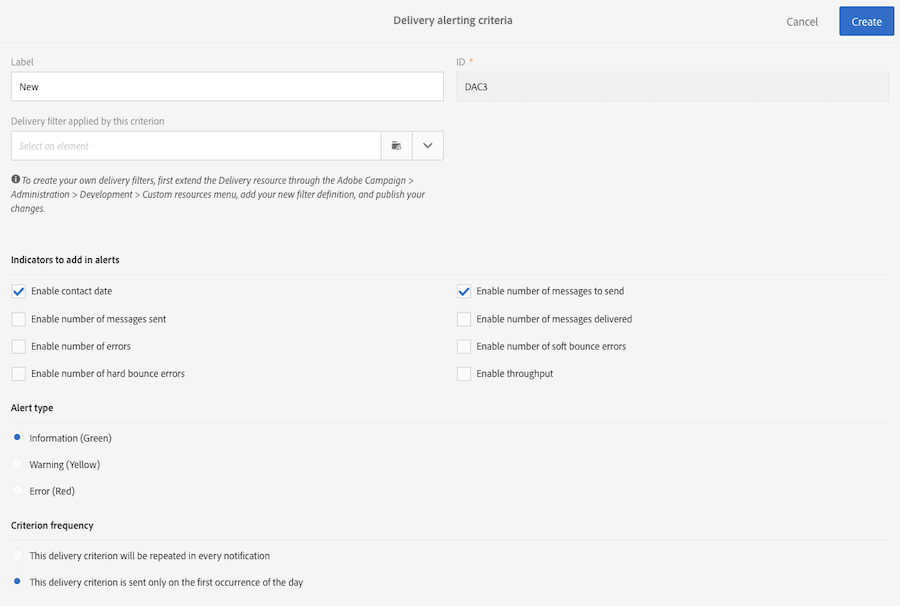
Step One: Click "Create" to define new criteria based on the newly created Delivery filter.
Step Two: Enter a meaningful Label name, e.g. Finished email deliveries.
Step Three: Expand "Delivery filter applied by this criterion" and select the "Finished deliveries" filter that was just published on the Delivery resource.
Step Four: For the "Indicators to add in alerts," select the indicators desired for the report.
Step Five: Set "Alert type" to "Information (Green)."
Step Six: The setting for "Criterion frequency" will depend on the type of delivery and the desired frequency for how often these notifications should be delivered.
- "This delivery criterion will be repeated in every notification" might be used if you have a delivery that deploys at intervals throughout the day, and the user group wants to be notified when each occurrence completes. However, if the delivery runs hourly or more frequently, those users might not want to receive an email for each occurrence.
- "This delivery criterion is sent only on the first occurrence of the day" will do exactly what it says and only send the notification the first daily occurrence of each delivery, regardless of how many times that delivery executes in one day.
Step Seven: Click "Create" to save the Delivery alerting criteria.
Configure the Delivery Alerting Dashboard
Navigate to Campaign (upper left logo menu) > Administration > Channels > Delivery alerting > Delivery alerting dashboards and the list of existing dashboards displays. The "Default delivery alerting dashboard (default)" includes criteria for error and warning conditions. If a new notification falls into the error and warning category, then edit the "Default delivery alerting dashboard (default)" to add the newly created criteria. The example here is building a notification of successful deliveries, so a new dashboard will be created for this purpose.
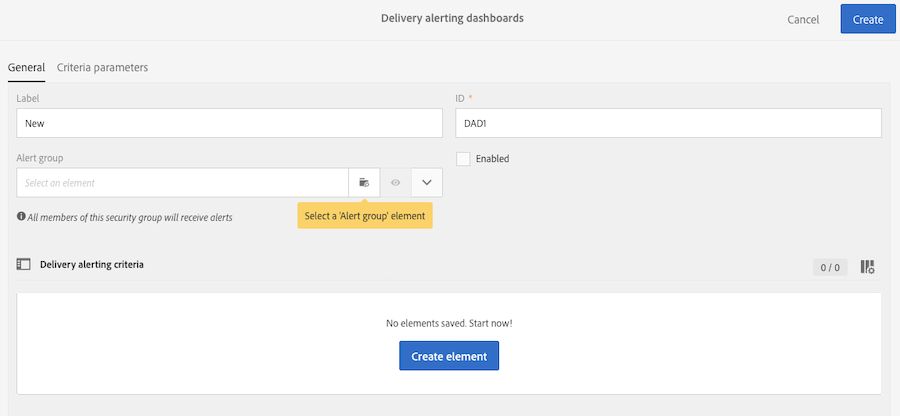
Step One: On the Delivery alerting dashboards page, click "Create" to build a new dashboard.
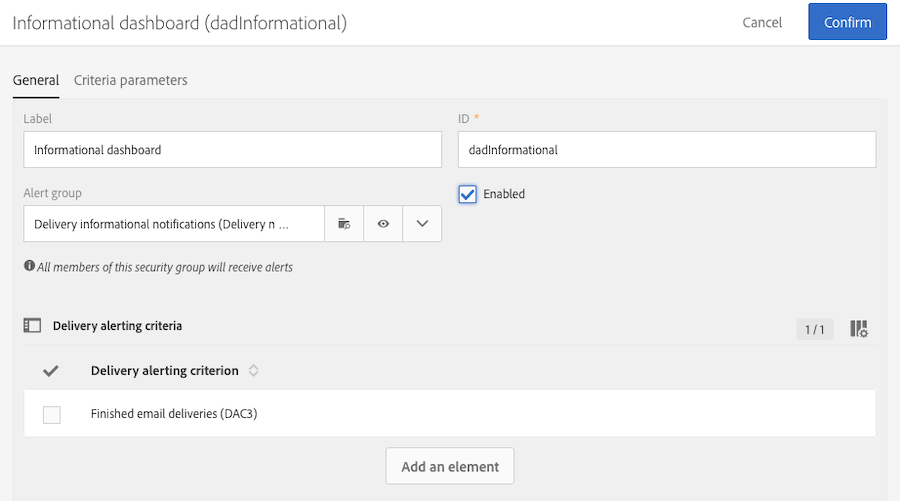
Step Two: Enter a "Label" that defines the dashboard, e.g. Informational dashboard.
Step Three: For "ID," override the default value with a unique value, e.g. dadInformational.
Step Four: Expand the "Alert group" dropdown and select the Delivery notification group that will receive these notifications.
Step Five: Add the "Delivery alerting criteria" to the dashboard:
- Click "Create element" and the "Select a 'DeliveryAlertingCriteriaBase' element" popup displays with a list of alerting criteria.
- Select the desired criterion. In this example, select "Finished email deliveries," then click "Confirm" and the dashboard definition updates.
Step Six: Check the "Enabled" checkbox.
Step Seven: Click "Criteria parameters" and, if necessary for your implementation, modify settings there.
Step Eight: Click "Confirm" to save the Delivery alerting dashboard with the new notification.
Final Considerations
Delivery notifications provide a simple method to increase marketing automation and assure end users that their communications are being sent, or to indicate potential problems with deliveries.
At the time of this writing, there is a bug in ACS that will impact custom notifications: any time a "Prepare publication" step is taken on Custom resources, even if the changes aren't to the Delivery custom extension, the link between the Delivery alerting criteria and the filter on the Delivery is broken and the custom notifications will stop sending. To correct this issue, go back to the steps in the "Enable the Delivery Notification" section of this post, and reset the "Delivery filter applied by this criterion" value, which will be blank after the "Prepare publication."
